
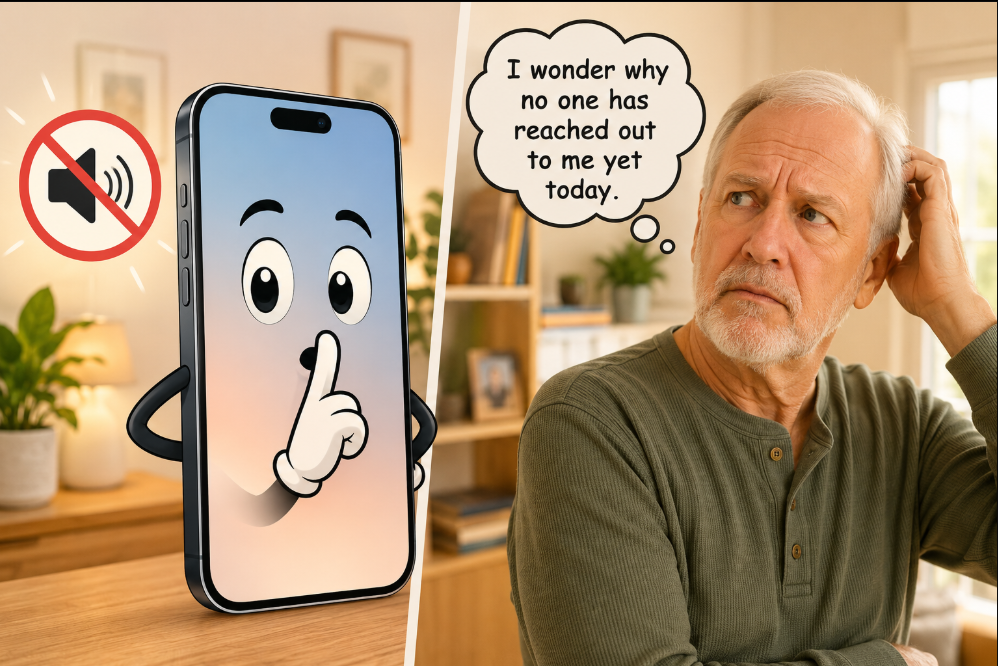
Raise your hand if this has ever happened to you. Right before you tuck yourself in for the night, you switch your phone to silent mode so no pesky phone dings, rings, or dongs wake you up in the middle of the night. Morning comes, life gets going, and next thing you know, it's lunchtime and you clue in that nobody's reached out to you all day. The good news is, it's not that you've suddenly become unpopular, it's that you simply forgot to turn silent mode back off, and your phone's been silently ignoring everyone since last night.
If you've experienced this once before (or you're not ashamed to admit maybe it's happened more than once) and you've wondered if there's a better way, let me introduce you to our latest post. How to schedule Do Not Disturb on iPhone, so this stops happening for good.
Quick note before we start:
this topic turned out to have a lot more to it than expected, so I've split it into two posts. This first one covers everything you need to get a reliable Do Not Disturb schedule running, plain and simple.
Do Not Disturb is really just one piece of a bigger system called Focus, and if you ever find yourself curious about the rest of it down the road, what Focus actually is, plus some of its more advanced options like adding a specific contact who can always reach you, or controlling exactly which apps can interrupt you, there's a second post waiting for you at the end of this one.
With that out of the way, let's jump right into it. Your online tech nephew has you covered.
Just Need the Quick Steps?
- 1Settings
- 2Focus
- 3Do Not Disturb
- 4Add Schedule
- 5Time
- 6Set your start and end time, and select your days you'd like it set for, then tap the blue checkmark in the top right corner.
From then on, it turns itself on and off, no remembering required.
Keep reading for the full, detailed walkthrough with more information and helpful tips, plus step-by-step instructions with pictures, including how to make sure the people who matter most can still reach you, even while everything else stays quiet.
Why This Beats Manually Toggling Silent Mode Every Night
Think of it like a programmable thermostat. When you first set it up, you tell it to cool the house down during the day, when the sun's already doing half the work, then have it switch to heat mode to warm things back up again at night. From that point on, it runs automatically, and you shouldn't have to touch the dial again.
A scheduled Do Not Disturb works the same way on your iPhone, quiet at night, back to normal by morning, all on autopilot.
Right now, you're probably doing this the hard way, twice a day, every day. Silent mode at night, and a high likelihood of forgetting to turn the volume back on in the morning. With this guide, it takes the manual work out of it for you and you'll never have to wonder why your phone's gone quiet on a random Tuesday afternoon again.
First, a Quick Word on Names: Do Not Disturb vs. Focus
Before we start, there's one small change Apple made around late 2021 to Do Not Disturb that's worth explaining. If you're wondering why we're about to tap something called Focus when this guide is about Do Not Disturb, here's why.
The short of it is, Do Not Disturb used to stand alone. Then, when Apple made their change, they built a bigger container called Focus and put Do Not Disturb inside it.
Think of Focus like a mall that came in and gave all the smaller shops a bigger home.
Do Not Disturb used to be its own little independent store. Then, in the fall of 2021, Apple made a change, built a big mall called "Focus", and instead of standing on its own, Do Not Disturb was moved inside that mall alongside a few other stores.
The important part? Do Not Disturb is still there. You just have to walk through Focus (the mall) to find it now.
With that cleared up, here's exactly how to schedule Do Not Disturb on iPhone, step by step.
How to Schedule Do Not Disturb on iPhone
Step 1: Open the Settings app.
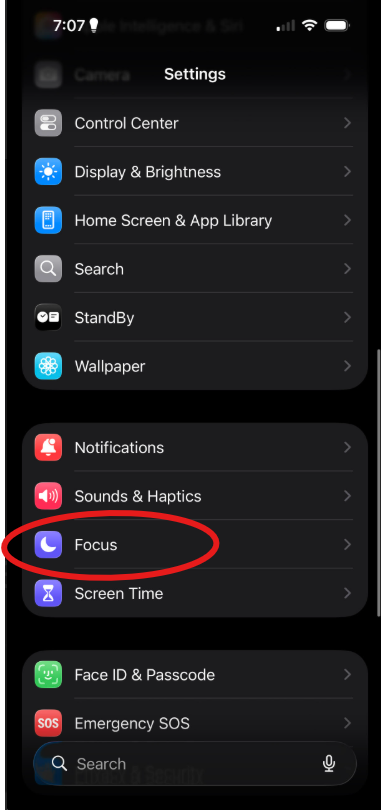
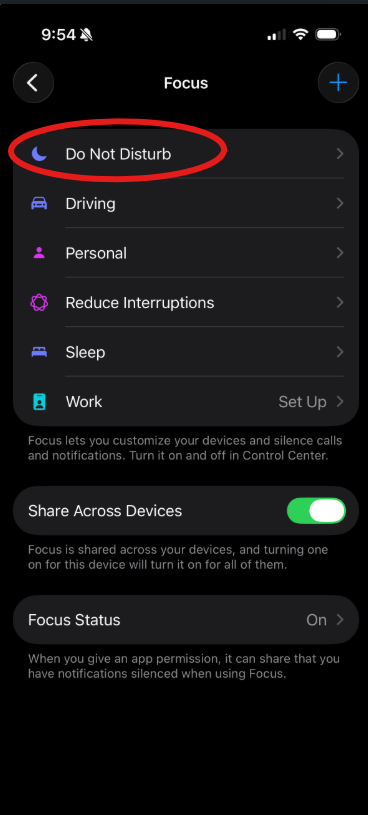
Step 2: Tap Focus. You'll find it partway down the list, look for an icon that looks like a crescent moon.
Step 3. Tap Do Not Disturb. It's one of the options in the Focus list. Usually near the top. Everything else you see in that list, Driving, Personal, Reduce Interruptions, Sleep, Work, etc. Those are the "new neighbours" in the department store we mentioned in the previous section.
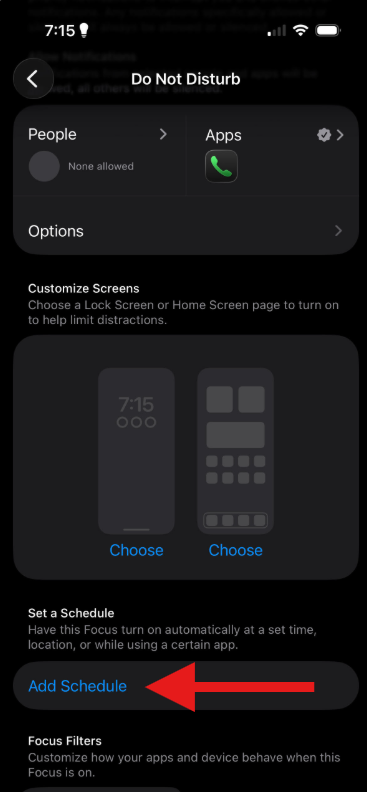
Step 4: Scroll down and tap Add Schedule. It should be near the bottom of the menu.
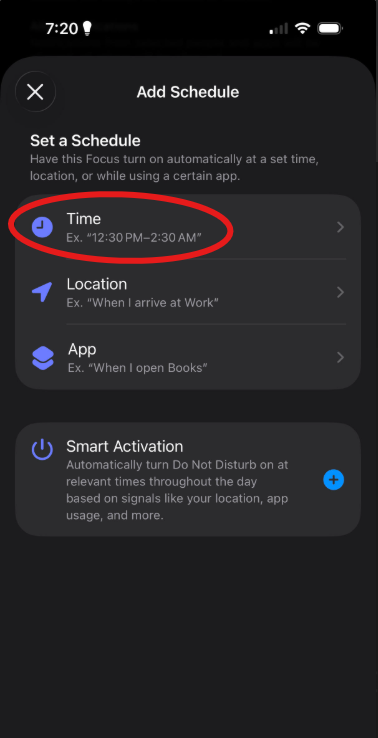
Step 5: Tap Time. You'll see 3 options here: Time, Location, and App, plus something called Smart Activation.
Time is exactly what you want for a nightly schedule, so it will be our focus (no pun intended) for this post.
Location and Smart Activation both need some setup elsewhere on your iPhone before they'll work properly, and App turns things on only when you open a specific app rather than at a set time. None of these are needed for tonight's schedule, so go ahead and tap Time to keep moving.
Step 6: Set your From and To times. This is where you decide exactly when it turns on and when it turns back off.
For example, if you want Do Not Disturb to run from 10:00 PM to 7:00 AM, set From to 10:00 PM and To to 7:00 AM. Just tap each time to bring up a dropdown and pick the one you want.
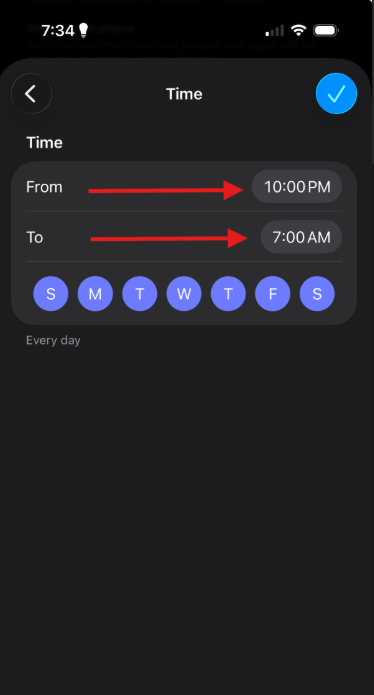
Step 7: Choose your days, then tap the blue checkmark in the top right corner to save your schedule.
By default, every day of the week is selected. Uncheck any day you don't want this to apply to, or leave it as is if you want it running every night. The screenshots below show the difference, every day selected by default, versus Friday and Saturday deselected, which turns them from purple to grey.
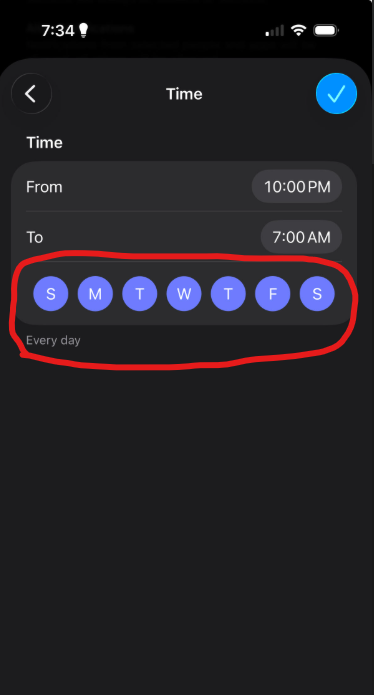
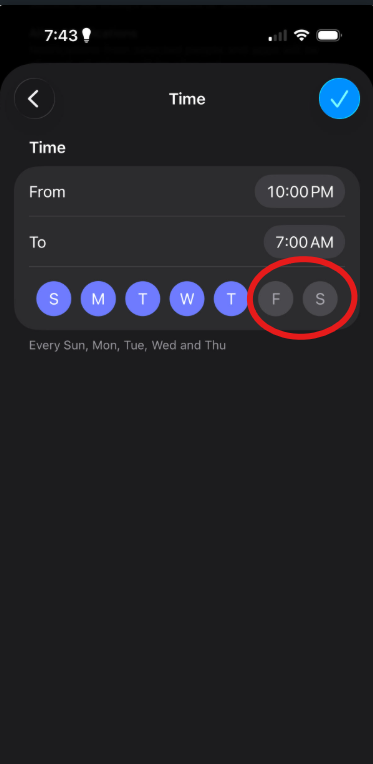
That's it. From tonight onward, your iPhone quiets itself down and wakes itself back up, right on the schedule you set for it. No more remembering to turn on and off silent mode manually!
A Quick Heads-Up About Alarm Apps And Do Not Disturb
If you wake up using Apple's built-in Clock app for your alarm, you're all set, and don't have to worry. It'll still ring right through Do Not Disturb, no extra steps needed and you can skip ahead (tap Here to skip to the next section).
The same goes if you don’t use your iPhone as your alarm at all. Maybe you use an old-fashioned alarm clock, a Google Home or Alexa, a sunrise alarm clock, or something else entirely. If that's you, you can skip this section too (tap Here to skip to the next section).
But if you downloaded a third-party alarm app from the App Store and use that to wake up, well, then this section is for you. Do Not Disturb may silence notifications from that app, which is the last thing you want on a morning you actually need to be up.
The easiest fix is to stick with Apple's built-in Clock app for anything time-sensitive like this. But if you have an alarm app you already know and trust, and you'd rather keep using that, you can add it to your allowed apps instead. Just follow these steps.
1) Tap Apps under this same Do Not Disturb menu (Settings > Focus > Do Not Disturb).
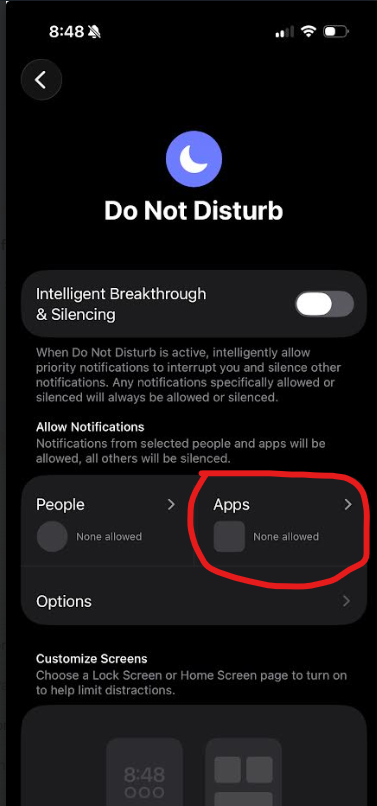
2) Then choose Allow Notifications From and add your alarm app to the list.
Don't worry if that felt quick, we'll walk through the Apps screen in a lot more detail later in this post, so a fuller set of instructions is coming your way.
Don't Worry, You Won't Miss a Real Emergency
This is usually the part that gives people the most pause, and it's a fair thing to wonder about. If your phone is quiet all night, what happens if someone close to you has an emergency and really needs to reach you?
The good news is Apple built in a few ways to make sure the people who matter most can still get through, even while everything else stays silent. Here's how to set that up.
Step 1: From the same Do Not Disturb menu (Settings > Focus > Do Not Disturb), tap People. This should be near the top of the menu.
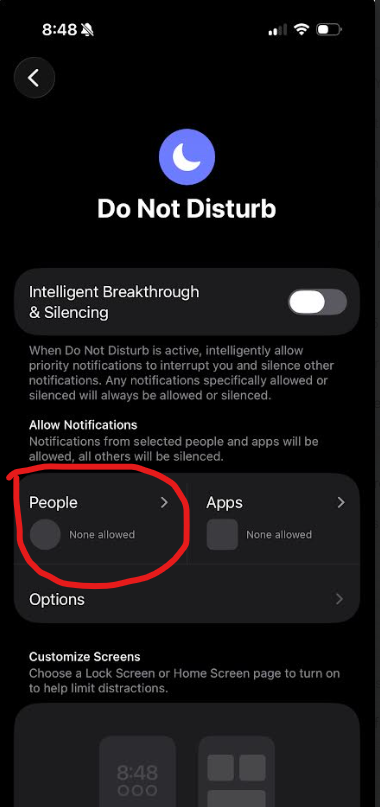
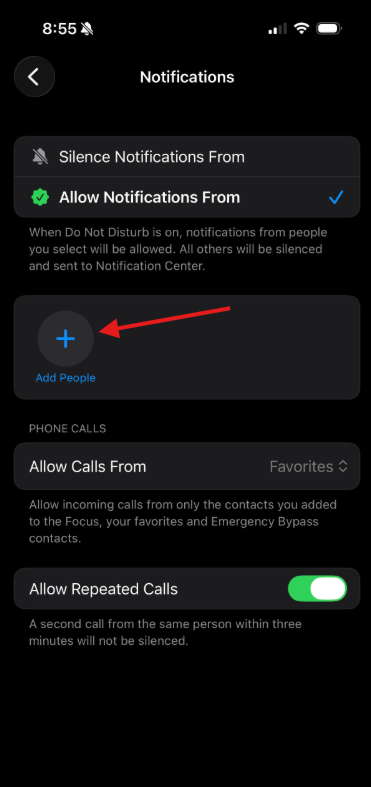
Step 2: Tap Add People, then choose the people you want to always get through. A spouse, your kids, a close friend, whoever you decide has the power to break through your Do Not Disturb barrier, and you want to hear from no matter the hour. The choice is totally yours!
Before you move on, double check that "Allow Notifications From" is selected, not "Silence Notifications From," they're opposite settings, and it's normally set to Allow by default, but it's worth a quick glance to be sure. These are the two settings directly above Add People and you can see that Allow Notifications From has the blue checkmark to the right and the green checkmark to the left.
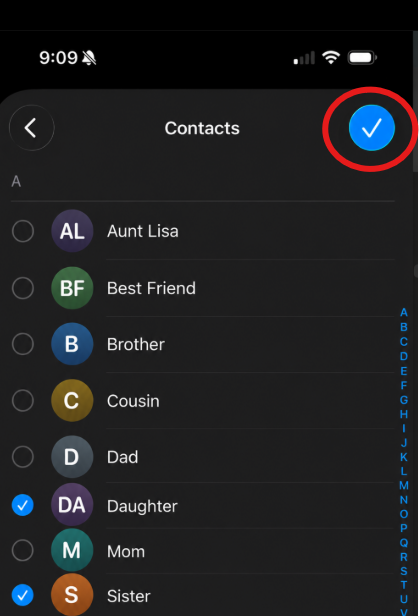
Step 3: Select the contact(s) whose notifications you'd like to have be able to pass through your Do Not Disturb setting by tapping on their name. Then, hit the blue checkmark in the top right corner to save your selection(s). In the example below you can see Daughter and Sister are both selected.
One important distinction here: this step only covers texts and app notifications, not phone calls. Phone calls are handled completely separately, and that's exactly what we're setting up next in Step 4.
Step 4: Now, let's handle phone calls, which work a little differently.
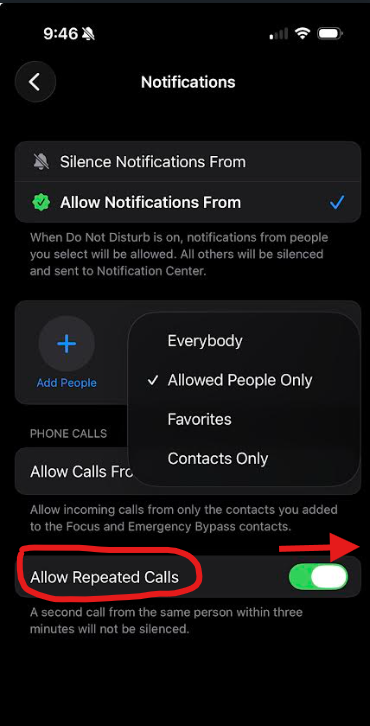
Tap Allow Calls From and choose Allowed People Only. This reuses the exact list of people you just added above, so nothing extra to set up.
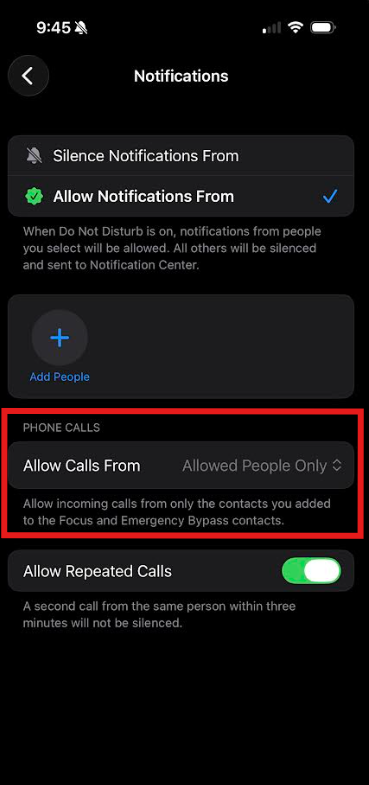
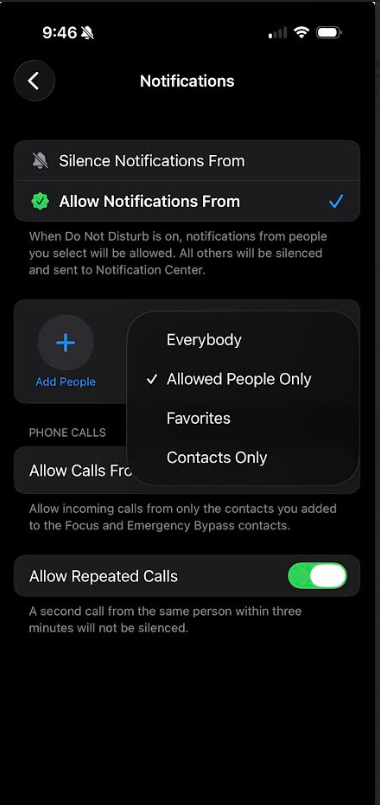
Once you've selected Allowed People Only, a toggle called Allow Repeated Calls should appear right below it. This one's specifically for people who aren't on the list you just built.
Let's say you didn't think to add your neighbour for example, and one night, when you're not home, your neighbour notices smoke coming from your house late at night and your phone is in its Do Not Disturb mode. If they call once, it'll be silenced like any other call. But if they call again within a few minutes, that second call rings through, even though they're not on your list.
Whether or not to turn it on is entirely up to you, some people like the extra peace of mind, others would rather stick strictly to the list they build of pre-approved people. If you want it on, just turn the toggle on like the screenshot below, if not, make sure the toggle button is turned off (to the left).
What Happens to Notifications While Do Not Disturb Is On?
One thing worth clearing up before we wrap this up. Do Not Disturb doesn't delete anything. It just holds notifications back quietly until you're ready for them.
While it's on, texts, emails, and app alerts still arrive, your phone just stays silent and the screen stays dark instead of lighting up and buzzing.
Everything is sitting there waiting for you, exactly as if you'd checked your phone the whole time. The exception is anyone you specifically let through in the People steps above, they still come in with sound, exactly the way you set them up to.
So nothing gets lost. It's more like your phone quietly took messages for you overnight, the same way an answering machine used to, and hands them all over the moment you're ready to look.
You're All Set
Now that you know how to schedule Do Not Disturb on iPhone, you can set it up once and let your phone handle the rest, quiet when you want to sleep, back to normal the moment you're up, without you having to remember a thing.
Best part is, you're the one who decides how strict to be. Want to be a complete brick wall and let absolutely nothing through? That's an option. Want to hand out a little VIP access to a few special people? That's an option too. Either way, you're the one calling the shots, your iPhone just follows orders.
Add the people who matter most to your allowed list, decide whether repeated calls fit your comfort level, and you can silence your phone with total peace of mind. No more wondering by mid-afternoon why nobody's texts are coming through, only to realize your phone's been quiet since the night before.
Apple's own guide → Apple Support - Allow Or Silence Notifications For a Focus on iPhone covers this topic in more detail if you want a second reference.
If you enjoyed this idea of setting something up once and letting your iPhone take it from here, my other post → Ole Dog New Tech - How to Schedule A Text Message works the exact same way, write it once, and your phone sends it right on time without you lifting a finger again.
That covers everything you need for a reliable nightly schedule. If you'd like to go further, add a specific contact who can always reach you no matter what, control which apps stay noisy, or understand what Focus actually is, this next post → Ole Dog New Tech - What is Focus Mode on iPhone covers all of it.
Is there another iPhone habit that's been driving you a little crazy? Leave me a comment below and tell me about it. It just might be the subject of my next post.
Until next time,
Your Online Tech Nephew.
Frequently Asked Questions
Do I have to schedule Do Not Disturb on iPhone for every single day, or can I pick specific ones?
You can pick exactly which days you want. When you set up the schedule, every day is selected by default, but you're free to uncheck any day that doesn't apply, weekends off, weekdays only, whatever fits your routine.
Will I still get emergency calls or texts while it's on?
Yes, as long as you've set things up the way we walked through above. Anyone you've added to your People list can still reach you no matter what.
If you turned on Allow Repeated Calls, even someone outside your list can get through on a second call within a few minutes. Everyone else stays quiet until your scheduled time ends.
What if I wake up early, before the scheduled end time?
No problem at all. Open Control Center by swiping down from the top right of your screen, and tap the Focus icon.
Or even easier, just ask Siri to "turn off Do Not Disturb", and it switches off right away. Your schedule picks back up again the next night, exactly as you set it.
Will this also silence my iPad or other Apple devices?
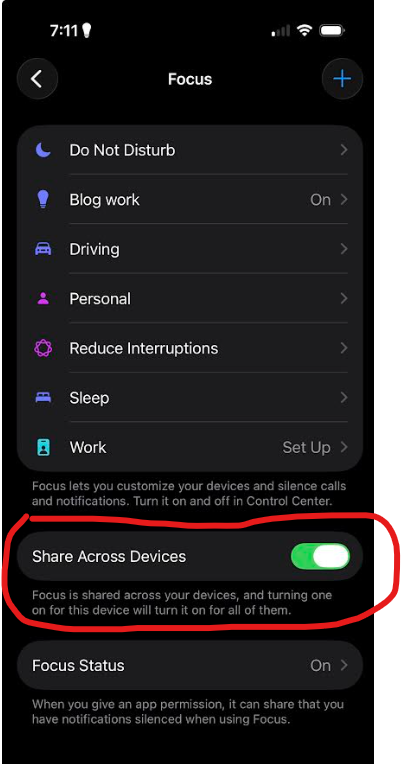
It can, if you have a setting called Share Across Devices turned on in your Focus settings, and your other devices are signed into the same Apple ID.
If you'd rather keep it iPhone-only, you can turn that setting off, and your other devices will carry on as usual while just your iPhone stays quiet.
Settings > Focus > Share Across Devices